Topic collectors and topic viewers require an X12 | ID sign in and users are given permission to use them. Send an email to support@x12.org asking for permission.
Topic Collectors
- 008040X109 | Health Care Provider Directory | 274
- 005050X229 | Automobile Property Record Change Notification | 266/824
- 008030X308 | Mortgagee Notification, Billing, and Payment | 811/820
- 008030X370 | Health Care Good Faith Estimate | 837
- 008040X372 | Third Party Liability Insurance Disclosure | 834
Topic Viewers
- 008040X109 | Health Care Provider Directory | 274
- 008030X370 | Health Care Good Faith Estimate | 837
Navigate to the technical report and sign in using an X12|ID.
The system displays the technical report navigation table of contents in the left pane, with the cover page selected by default. The right pane displays the cover content.
Note that segment data elements and the composite data element's components are separated out in the table of contents as individual pages (Figure 1). This is to aid in topic submission and will not be handled in this way in the published document.
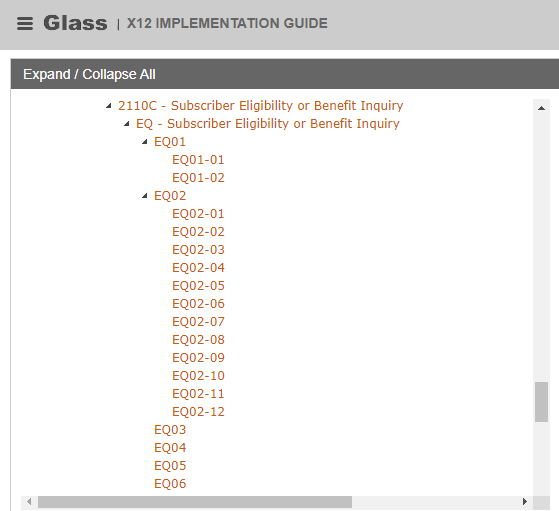
FIGURE 1
Select a page to view from the table of contents.
The system displays the selected content and a "Submit topic …" link at the top of the content pane. There are four different types of "Submit topic" forms:
- Submit topic for this front matter.
- Submit topic for this segment's header.
- Submit topic for this simple data element.
- Submit topic for this composite data element.
- Submit topic for this component data element.
When viewing a front matter page, the user clicks on the link at the top of the page: "Submit topic for this front matter."
The system displays a pop-up window (See Figure 2).
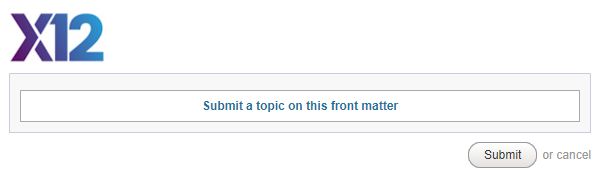
FIGURE 2
Click on the sentence "Submit topic for this front matter," which serves as the topic category.
The system displays an edit field (See Figure 3).
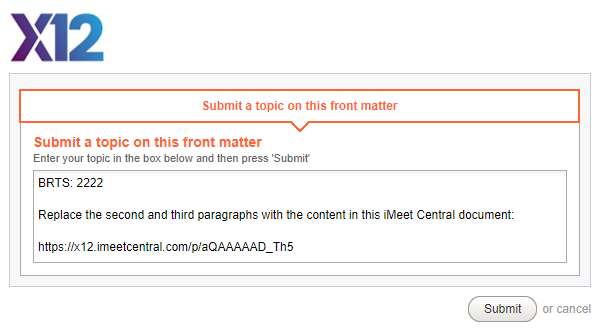
FIGURE 3
Enter your topic, adding any necessary business requirement references for traceability. Consider writing your topic with a plain text editor, such as Notepad, to prevent losing your edits in case of a browser time-out. Then copy to the clipboard and paste the text into the edit field. If you need to enter a complex topic or reference a document, post the document in iMeet and enter an iMeet permalink to the document in the edit field.
Click Submit to save your topic.
The system saves your topic and displays an acknowledgment pop-up window (See Figure 4).
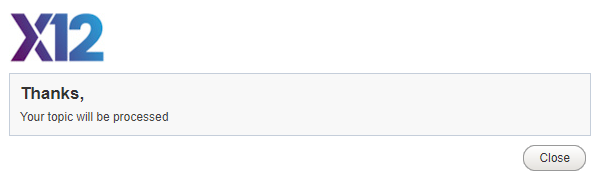
FIGURE 4
Click Close.
The system closes the acknowledgment pop-up.
Alternatively, click Cancel to end the process and not submit a topic.
The system closes the pop-up window.
When viewing a segment header page, the user clicks the link at the top of the page: "Submit topic for this segment's header."
The system displays a pop-up window (See Figure 5).

FIGURE 5
Click on the sentence "Submit a topic on this segment's header," which serves as the topic category.
The system displays a list of subcategories (See Figure 6).
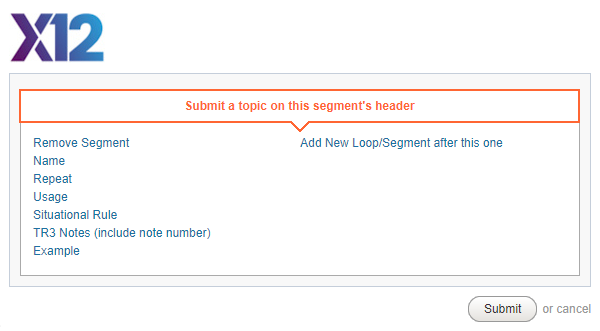
FIGURE 6
Click on the appropriate subcategory.
The system displays an edit field (See Figure 7).
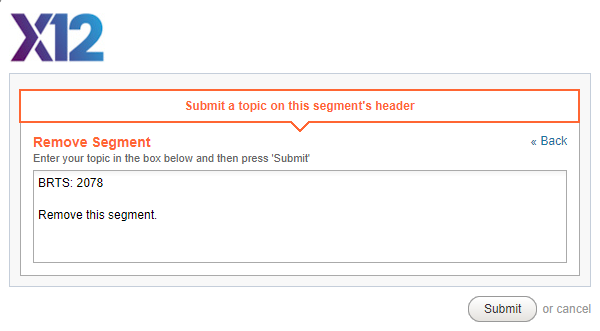
FIGURE 7
Enter your topic, adding any necessary business requirement references for traceability. Consider writing your topic with a plain text editor, to prevent losing your edits in case of a browser time-out. Then copy to the clipboard and paste the text into the edit field. If you need to enter a complex topic or reference a document, post the document in iMeet and enter an iMeet permalink to the iMeet document in the edit field.
Click Submit to save your topic.
The system saves your topic and displays an acknowledgment pop-up window (See Figure 8).
FIGURE 8
Click Close.
The system closes the acknowledgment pop-up.
Alternatively, click Cancel to end the process and not submit a topic.
The system closes the pop-up window.
When viewing a composite data element page, the user clicks the link at the top of the page: "Submit topic for this composite data element."
The system displays a pop-up window (See Figure 9).
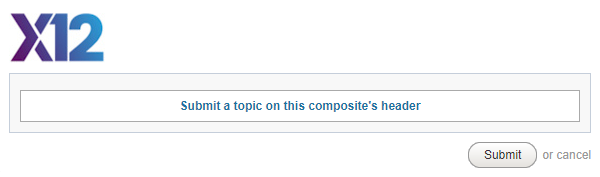
FIGURE 9
Click on the sentence "Submit a topic on this composite's header," which serves as the topic category.
The system displays a list of subcategories (See Figure 10).
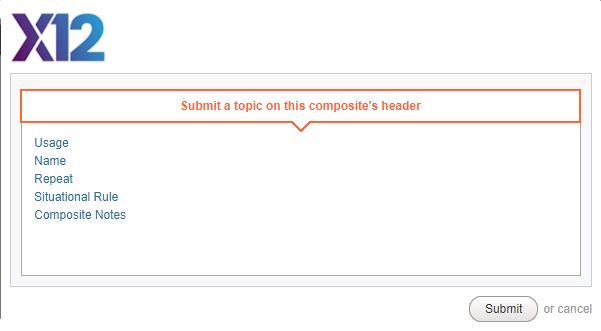
FIGURE 10
Click on the appropriate subcategory.
The system displays an edit field (See Figure 11).
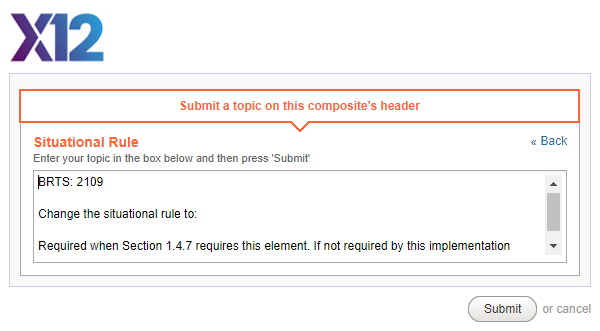
FIGURE 11
Enter your topic, adding any necessary business requirement references for traceability. Consider writing your topic with a plain text editor, to prevent losing your edits in case of a browser time-out. Then copy to the clipboard and paste the text into the edit field. If you need to enter a complex topic or reference a document, post the document in iMeet and enter an iMeet permalink to the iMeet document in the edit field.
Click Submit to save your topic.
The system saves your topic and displays an acknowledgment pop-up window (See Figure 12).
FIGURE 12
Click Close.
The system closes the acknowledgment pop-up.
Alternatively, click Cancel to end the process and not submit a topic.
The system closes the pop-up window.
When viewing a component data element page, the user clicks the link at the top of the page: "Submit topic for this component."
The system displays a pop-up window (See Figure 12).
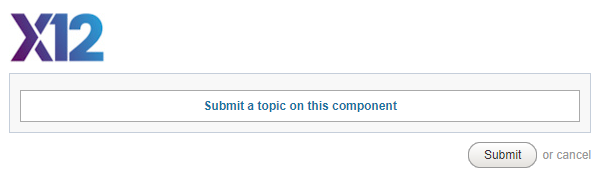
FIGURE 12
Click on the sentence "Submit a topic on this component" which serves as the topic category.
The system displays a list of subcategories (See Figure 13).
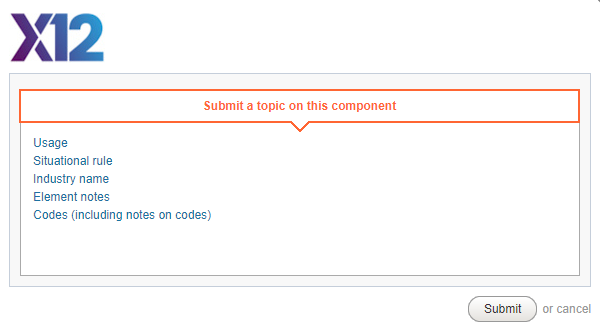
FIGURE 13
Click on the appropriate subcategory.
The system displays an edit field (See Figure 14).
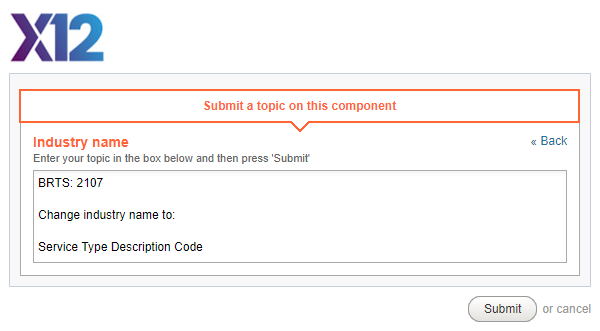
FIGURE 14
Enter your topic, adding any necessary business requirement references for traceability. Consider writing your topic with a plain text editor, to prevent losing your edits in case of a browser time-out. Then copy to the clipboard and paste the text into the edit field. If you need to enter a complex topic or reference a document, post the document in iMeet and enter an iMeet permalink to the iMeet document in the edit field.
Click Submit to save your topic.
The system saves your topic and displays an acknowledgment pop-up window (See Figure 15).
FIGURE 15
Click Close.
The system closes the acknowledgment pop-up.
Alternatively, click Cancel to end the process and not submit a topic.
The system closes the pop-up window.
When viewing a simple data element page, the user clicks the link at the top of the page: "Submit topic for this simple data element."
The system displays a pop-up window (See Figure 16).
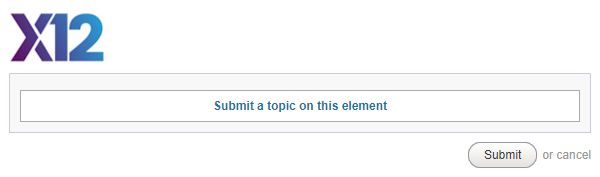
FIGURE 16
Click on the sentence "Submit a topic on this element," which serves as the topic category.
The system displays a list of subcategories (See Figure 17).
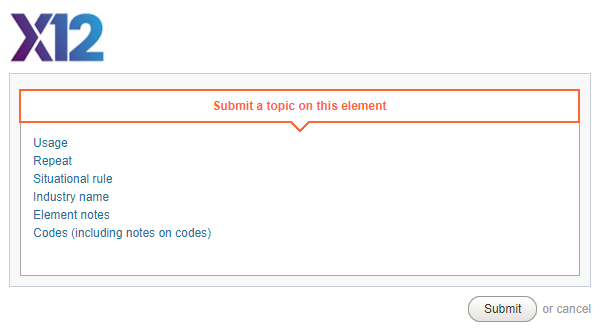
FIGURE 17
Click on the appropriate subcategory.
The system displays an edit field (See Figure 18).
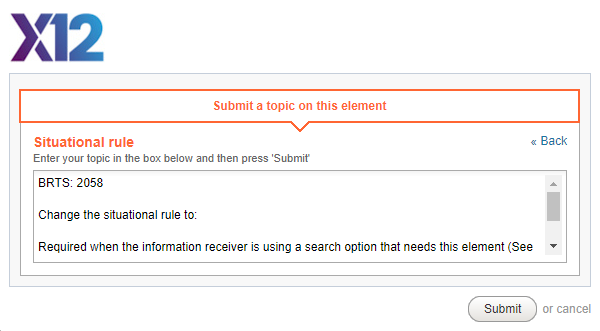
FIGURE 18
Enter your topic, adding any necessary business requirement references for traceability. Consider writing your topic with a plain text editor, to prevent losing your edits in case of a browser time-out. Then copy to the clipboard and paste the text into the edit field. If you need to enter a complex topic or reference a document, post the document in iMeet and enter an iMeet permalink to the iMeet document in the edit field.
Click Submit to save your topic.
The system saves your topic and displays an acknowledgment pop-up window (See Figure 19).
FIGURE 19
Click Close.
The system closes the acknowledgment pop-up.
Alternatively, click Cancel to end the process and not submit a topic.
The system closes the pop-up window.